Direct-to-Film Printing has emerged as a versatile, affordable solution for custom apparel and soft goods. As brands and hobbyists pursue on-demand production, mastering DTF printing techniques can unlock vibrant designs, strong wash-fastness, and the ability to print on a wide range of fabrics. This overview introduces the Direct-to-Film printing process and the essential tools, while also sharing DTF transfer paper tips to optimize results. With careful attention to color management, powder adhesion, and curing, you can achieve professional transfers that hold up to washing. Whether you are starting small or scaling up, understanding DTF troubleshooting and tips helps avoid common pitfalls.
In practical terms, the technology behind today’s garment transfers can be described as a film-to-fabric workflow that moves artwork from a PET sheet to textile through heat and adhesive. Experts talk about this as a complete digital-to-fabric transfer process, leveraging specialized inks, white underbase capabilities, and the right DTF printer tools to reproduce color and opacity. When comparing methods, readers often weigh DTF vs sublimation to determine which strategy suits cotton-rich products or polymer-coated materials. Guidance on choosing the right films, powders, and heat settings tends to revolve around the same core ideas: workflow simplicity, substrate compatibility, and long-term wash performance. Beyond techniques, attention to workflow design and color management helps ensure consistent results across batches and keeps your content aligned with what customers search for.
DTF Printing Techniques for Direct-to-Film Printing: Core Methods for Vibrant Transfers
Direct-to-Film Printing relies on a set of proven techniques to maximize color, opacity, and durability. In practice, designers often separate white underbase from color layers, especially for dark fabrics, while selecting the right transfer film and adhesive parameters. Understanding DTF printing techniques helps you tailor your workflow to fabric type and design complexity, improving consistency across runs. The process, commonly described as a Direct-to-Film printing process, blends digital design with a film-based transfer that can yield soft handfeel and vibrant visuals.
Consider the balance between print order, ink chemistry, and post-processing. The choice of film, white ink placement, and powder adhesion strategy are all part of the core techniques that determine wash-fastness and color fidelity. By mastering these DTF printing techniques, you can optimize opacity on dark fabrics, control edge sharpness, and reduce wasted prints—critical for hobbyists as well as small brands aiming for on-demand production.
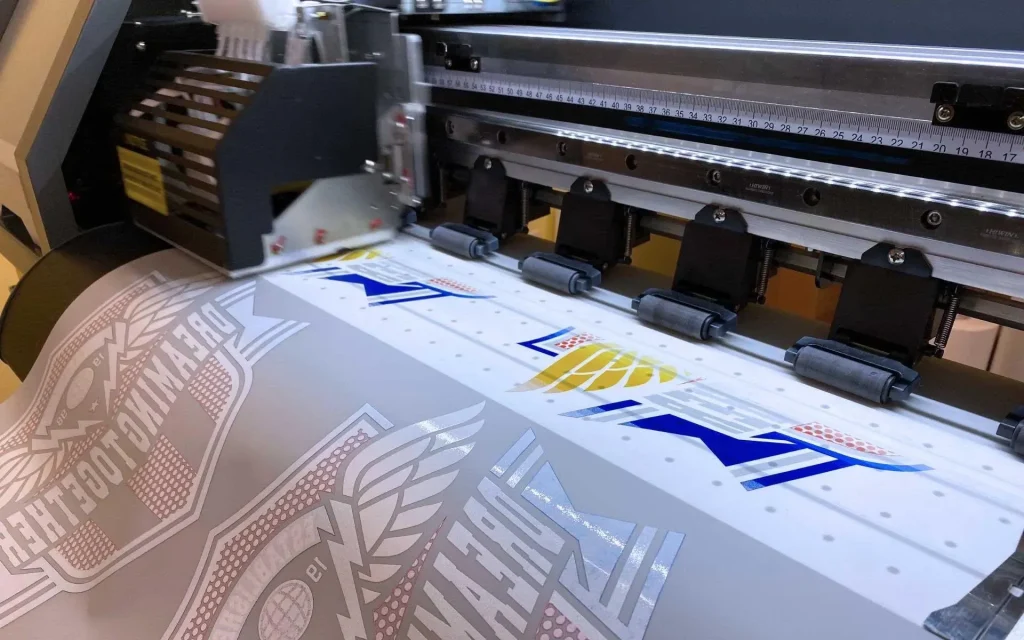
Essential DTF Printer Tools for Consistent Quality and Efficiency
A solid toolkit for DTF starts with reliable DTF printer tools. Invest in a printer designed for DTF, quality white ink channels, and clean, stable ink delivery. In addition to the printer, you’ll need compatible transfer films and adhesive powders that match your workflow. Understanding DTF printer tools helps you diagnose head clogging, ink starvation, and alignment issues before they become costly mistakes.
Beyond the hardware, RIP software and color management are essential DTF printer tools that keep colors consistent across batches. Calibrated monitors, ICC profiles, and color queues ensure accurate reproduction, while routine maintenance—cleaning heads, checking nozzles, and inspecting film stock—prevents downtime. A well-rounded toolkit also includes PPE, ventilation, and a tidy workspace to protect both the operator and the print quality.
Direct-to-Film Printing Process: A Practical Step-by-Step Guide
Direct-to-Film Printing Process: A Practical Step-by-Step Guide lets you translate design into durable transfers. Start with artwork prepared for fabric, including white underbase for dark textiles, then proceed to print on the DTF film using your chosen inks and sequence. This segment describes the end-to-end flow from design to finishing, highlighting the critical role of each stage in quality outcomes.
During the process, pay close attention to powder adhesion, curing, and the transfer phase. The film’s adhesive powder must be evenly applied and cured before the transfer to fabric. The transfer to fabric is where heat, pressure, and timing determine how well the ink embeds into fibers, so following the Direct-to-Film printing process guidelines helps you avoid common issues and achieve consistent results.
DTF Troubleshooting and Tips: Solving Common Challenges
DTF Troubleshooting and Tips address recurring challenges that can derail production. Banding, color shifts, or faint whites can signal ink settling, nozzle gaps, or improper film handling. By analyzing these symptoms through the lens of DTF troubleshooting and tips, you can pinpoint whether to adjust color profiles, revise white underbase density, or refine powder application.
Another frequent issue is powder delamination or incomplete transfer. Solutions include verifying curing time, ensuring film is dry and dust-free, and matching heat press settings to fabric weight. Regularly reviewing your workflow against best practices in DTF troubleshooting and tips helps you maintain consistency and protect investment in equipment and materials.
DTF vs Sublimation: Choosing the Right Path for Your Fabrics and Market
DTF vs Sublimation: Choosing the Right Path for Your Fabrics and Market explores platform differences for strategic decisions. DTF excels on cotton, blends, and varied textures, offering versatility that sublimation struggles to match on non-polyester fabrics. Considering the strengths of each method helps you build a product mix that serves broader customer needs.
From an efficiency and cost perspective, DTF often presents more consumables per print, but it reduces pre-treatment and substrate constraints, enabling quick turnover for small runs. Weigh the pros and cons of DTF vs sublimation in terms of durability, wash performance, and production workflow to determine the best fit for your catalog and budget.
Getting Started with DTF: Tools, Workflow, and Best Practices
Getting Started with DTF: Tools, Workflow, and Best Practices helps newcomers set a practical path. Define your niche, select a starter kit with accessible consumables, and begin collecting a small swatch library to guide test prints. This approach aligns with recommended DTF printing techniques while keeping the focus on quality and repeatability.
Several pragmatic steps accelerate learning: join online communities, watch tutorials, and iterate on the workflow. As you scale, plan for larger film stock, more transfer films, and additional printers. The process benefits from adherence to DTF printer tools, DTF transfer paper tips, and ongoing attention to color management, curing, and finishing.
Frequently Asked Questions
What are DTF printing techniques and how do they compare to other methods like DTG and sublimation?
DTF printing techniques involve printing on a PET film with textile inks (CMYK plus white), applying an adhesive powder, curing, and transferring the image to fabric with heat. This Direct-to-Film printing process yields vibrant colors, strong wash-fastness, and broad fabric compatibility, including cotton and blends. Compared with DTG and sublimation, DTF generally requires less pretreatment, offers easier substrate versatility, and can be more cost-effective for small runs.
What are the essential DTF printer tools for a beginner starting with Direct-to-Film printing?
Essential DTF printer tools for beginners include a dedicated DTF printer with white ink capability, compatible CMYK inks, and a reliable transfer film. You’ll also need adhesive powder, a heat source for the final transfer (heat press or conveyor dryer), RIP software for color management, and basic cleaning supplies. Starting with a reliable starter kit and readily available consumables helps you learn the workflow before scaling.
What DTF transfer paper tips help improve color brightness and adhesion?
DTF transfer paper tips emphasize choosing high-quality transfer films designed for DTF to ensure clean release and minimal residue, and using a dense white underbase on dark fabrics for opacity. Store films in a cool, dry place and handle them with clean hands to avoid fingerprints, while ensuring powder adhesion is even and properly cured for durable results. Fine-tuning printing parameters and performing swatch tests also help optimize color brightness and adhesion.
What are common DTF troubleshooting and tips to prevent issues like banding or poor adhesion?
DTF troubleshooting and tips cover issues such as banding, halos, or poor adhesion. Start with routine nozzle checks and printhead cleanings, verify color management and print order, and ensure the adhesive powder is evenly applied and properly cured. Also confirm correct heat press settings, fabric prep, and run test swatches to validate durability before full production.
DTF vs sublimation: when should you choose Direct-to-Film printing over sublimation?
DTF vs sublimation decisions depend on fabric and market needs. DTF offers broader fabric versatility (including cotton and blends) and easier customization for small runs, while sublimation excels on polymer-coated or 100% polyester fabrics with potentially lower ink costs for large volumes. Consider substrate availability, wash durability, and the required feel of the print when choosing between the two methods.
Can you summarize the Direct-to-Film printing process from design to finished transfer?
Direct-to-Film printing process starts with designing artwork and optimizing it for transfer, then printing onto the DTF film with appropriate ink layers (including white where needed). Next, adhesive powder is applied and cured, the fabric is pre-pressed, and the film is transferred to the garment using a heat press. Finally, the film is peeled away and a post-press step may follow to optimize softness and wash durability, with curing and testing to confirm color, adhesion, and durability.
| Aspect | Key Points |
|---|---|
| What is Direct-to-Film (DTF) Printing? | DTF Printing is a versatile, cost-effective transfer method that prints graphics on PET film using textile inks, then uses an adhesive powder and heat to transfer the image to fabric, enabling vibrant designs on a wide range of fabrics with good wash-fastness. |
| How DTF Works |
|
| Essential Tools & Materials |
|
| Step-by-Step: From Design to Finished Transfer |
|
| Tips for Optimal Results During Printing and Transfer |
|
| DTF vs Alternatives |
|
| Maintenance & Best Practices |
|
| Getting Started |
|
| Conclusion / Key Takeaways |
|
Summary
Direct-to-Film Printing opens a broad range of creative and business possibilities. With the right tools, a solid workflow, and careful color management and adhesion, you can produce vibrant designs across a wide array of fabrics. Compared to other decorative methods like DTG or sublimation, DTF offers flexible substrate compatibility, easier setup for small runs, and a scalable path for growth. By following the steps and tips outlined here, you can achieve durable, high-quality DTF prints that withstand repeated washes and faithfully convey your brand’s vision.

