DTF printing troubleshooting guides you through diagnosing and fixing common direct-to-film challenges, from ink handling and film alignment to transfer performance, so you can consistently deliver high-quality results. A practical approach combines regular printer maintenance, precise color management, and well-tuned heat-press variables to minimize failures and maximize production efficiency. This guide also highlights DTF transfer issues and practical fixes to restore system reliability across fabrics. You’ll learn to perform routine nozzle checks, calibrate RIP and ICC profiles, and maintain clean print heads to prevent performance dips. By following these steps, you can reduce waste, improve color fidelity, and build a scalable, profitable DTF workflow for your shop or hobby setup.
DTF Printing Troubleshooting: A Practical Guide to Diagnosing Common Issues
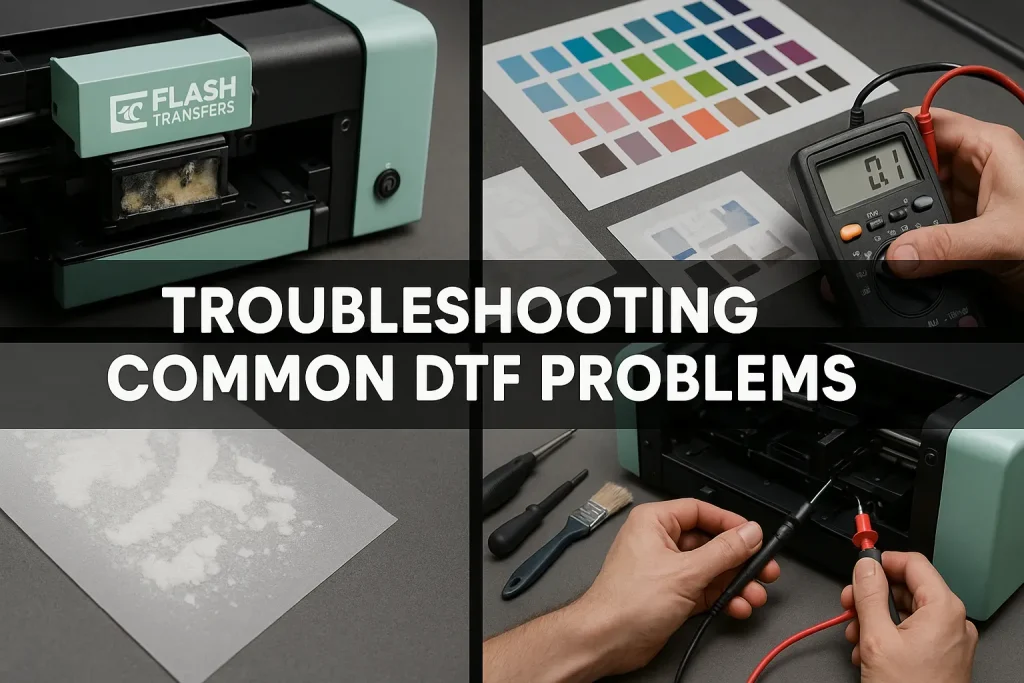
DTF printing troubleshooting starts with a clear diagnostic mindset. The final print quality depends on the printer condition, the ink system, the transfer film, any fabric pre-treatment, the transfer sheet, and the heat-press settings—all of which must work together. When one element slips, you may see color shifts, missing details, banding, or poor adhesion. A disciplined approach—beginning with a nozzle check, simple print-head maintenance, and verified RIP/ICC profiles—lets you isolate whether the issue is ink, film, or press parameters. This guide helps hobbyists and small shops move from guesswork to verified causes, saving material costs and time.
Practical workflow: start with a nozzle check and a thorough print-head cleaning; calibrate color profiles to match your inks and media; run small test prints before full production; and document each change. By framing problems as DTF printer troubleshooting, you can build a repeatable preventative routine that minimizes color drift and adhesion problems across runs.
DTF Ink Problems and Color Consistency
DTF ink problems are among the most noticeable issues in color fidelity. Banding, dull colors, or missing highlights often stem from ink viscosity, expired supplies, or mismatched color profiles. Inconsistent underbase opacity can also distort the final image, particularly on dark fabrics.
What to do: perform nozzle checks and head-cleaning; re-calibrate RIP/ICC profiles; verify ink set compatibility with your film and substrate; replace degraded inks; ensure proper curing to fix dull colors. Mentioning DTF ink problems here reinforces the need to treat ink quality and color management as a core part of the troubleshooting process.
DTF Film Quality Problems and Transfer Performance
DTF film quality problems can undermine color vibrancy and adhesion. If transfer results are blurry or ink transfers unevenly, check whether the transfer film is of high quality, matches your ink chemistry, and works with your printer settings. Poor transfer can also be a sign of suboptimal curing, or pre-treatment mismatch.
Resolution: use high-quality transfer film that aligns with your ink system, calibrate pre-treatment (spray distance, drying time, cure temperature) for the fabric, and adjust heat-press dwell time to maximize transfer yield. This helps address DTF film quality problems by ensuring film compatibility and proper processing parameters.
DTF Print Head Maintenance and Its Impact on Quality
DTF print head maintenance is critical for preventing banding, color gaps, and inconsistent density. Clogs or misaligned nozzles can create ghosting and missing details, especially on long runs. Regular maintenance routines—nozzle checks, head cleaning per manufacturer guidelines, and occasional deeper maintenance—help keep print heads healthy.
What to do: perform routine nozzle checks, run cleanings as recommended, recalibrate color profiles after head maintenance, and document any changes to monitor performance over time. A proactive print head maintenance program minimizes downtime and sustains print quality.
Fabric Prep, Adhesion, and Transfer Reliability
Adhesion reliability hinges on fabric type, pre-treatment, and film compatibility. Some blends require tailored pre-treatment and precise heat-press settings to ensure strong adhesion and durable color. Inconsistent performance on polyester blends often signals a mismatch between pre-treatment, ink, and transfer method.
Practical steps: test on small sample fabrics before batch runs; adjust pre-treatment spray distance, drying time, and cure temperature; confirm heat-press settings are appropriate for each fabric; verify adhesive compatibility with the selected transfer film and ink system. This aligns with DTF transfer issues when shifts occur mid-production and helps maintain consistent results.
Preventive Workflow and Documentation for Long-Term DTF Success
Establish a preventive workflow to minimize DTF issues. Regular QA checks, a troubleshooting log, and a small set of gold-standard test garments can flag deviations early. Calibrating after ink or media changes, firmware updates, and when adding new films ensures consistency across runs. This is central to ongoing DTF printer troubleshooting.
Invest in training and proper storage of consumables, maintain a controlled environment, and document fixes and outcomes. A disciplined approach reduces waste, shortens production times, and builds confidence in your DTF transfer process, ensuring long-term reliability and scalability.
Frequently Asked Questions
DTF printer troubleshooting: What causes banding in DTF printing and how can I fix it?
Banding in DTF printing is often caused by partially clogged or misaligned print heads, clogged nozzles, improper printer maintenance, or inconsistent ink viscosity. To fix it, run a nozzle check, perform a thorough print-head cleaning per your printer’s guidelines, recalibrate color profiles (RIP/ICC), verify the correct ink set for your film and substrate, and run test prints to confirm alignment before production.
DTF ink problems: Why are colors dull or drifting in DTF printing and how do I fix them?
Dull colors or color drift usually stem from a mismatch between the RIP/ICC profile and print settings, cheap or expired inks, or improper curing. Fixes include recalibrating and re-installing RIP/ICC profiles to match your inks and media, using compatible inks, replacing expired or degraded inks, and verifying that curing parameters are correct for the chosen fabric.
DTF transfer issues: Why is the transfer not sticking or peeling after heat pressing?
Adhesion problems are influenced by fabric type, pre-treatment, and heat-press settings. Address them by testing on a small sample fabric with the same pre-treatment, adjusting heat-press temperature, time, and pressure, ensuring transfer film compatibility with the ink system, and confirming proper curing of the adhesive before the final transfer.
DTF film quality problems: How does transfer film quality affect results and what checks should I perform?
Poor film quality can cause ink stills on the film, ink pickup, or blurry images, often due to a mismatch with ink chemistry. Check that you’re using high-quality transfer film compatible with your ink system, avoid over-saturating the film during printing, calibrate pre-treatment settings for the fabric, and run a small test to verify image sharpness and color transfer.
DTF print head maintenance: What routine maintenance helps prevent print-head failures in DTF printing troubleshooting?
Regular nozzle checks and print-head cleaning are essential, along with following the manufacturer’s maintenance schedule. Avoid harsh or excessive cleaning, keep the environment stable, update firmware and drivers when available, inspect seals and wipers, and log maintenance and nozzle test results to catch trends early.
DTF printer troubleshooting: What quick checks should I perform before a large run to avoid DTF transfer issues?
Before a large run, perform a nozzle check and a test print, verify heat-press settings (temperature, time, pressure) for the garment type, check alignment and media feed, test on a similar fabric, and use a small golden sample to validate inks, films, and pre-treatments before scaling up.
| Topic | Key Points |
|---|---|
| Overview |
|
| DTF Printing Basics |
|
| Color & Image Quality Problems |
|
| White Ink & Opacity Issues |
|
| Adhesion & Finish Issues |
|
| Standards & Processing Issues |
|
| Film Quality & Pre-Treatment Concerns |
|
| Preventative Tips to Reduce DTF Issues |
|
| Step-by-Step Fixes for Common Problems |
|
| Tips for Long-Term Success |
|

